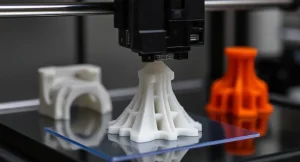
3D printing turns digital models into real, physical objects, and the process usually begins with an STL file. In this guide, you’ll learn what STL files are, how to create your own or find ready-made ones online, how to use slicer software such as Cura or PrusaSlicer to prepare them for printing, and practical tips to help you achieve successful results.
What Are STL Files?
STL stands for Standard Tessellation Language (sometimes called Standard Triangle Language). It was first used in early stereolithography software, but today it has become the standard format for almost all 3D printers.
An STL file is the digital file format that 3D printers and slicing programs can read. It only defines the outer shape of the object, without storing any extra information like colors, textures, or materials.
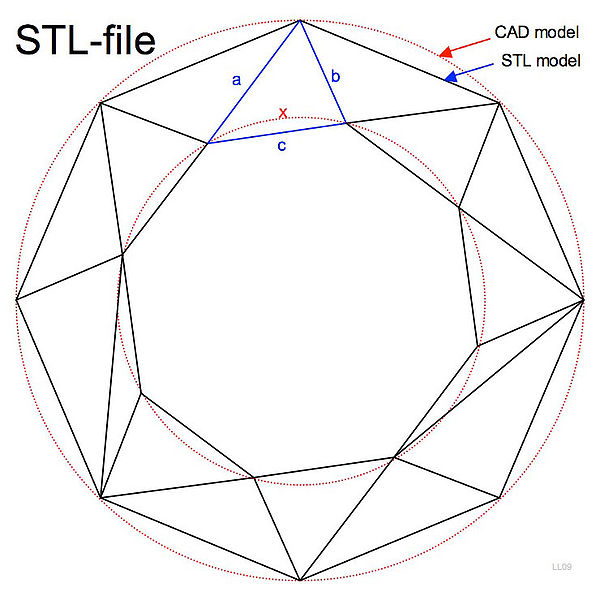
To do this, STL files break the surface of a 3D model into tiny connected triangles, a bit like covering the object with small tiles. The more triangles there are, the higher the resolution of the file, which makes curved surfaces look smoother and more realistic. Fewer triangles make the file smaller and faster to process, but curves may look faceted or “blocky.” Before printing, your STL will be converted into G-code – the step-by-step instructions that your printer actually follows.
Why STL for 3D Printing?
Nearly all printers and slicing programs can read STL files without any extra steps. The format’s triangle-based geometry makes it straightforward for slicer software to turn a 3D model into printable layers. At the same time, STL files are widely supported: even though most CAD programs use their own native formats, they can almost always export to STL, which makes it the common language between design tools and printers. Another practical benefit is size—because STL only stores surface geometry and leaves out details like color or textures, the files are generally compact and easy to share.
(You may also come across other formats like OBJ, which can carry extra data such as colors and textures. To see how the two compare, check out STL vs. OBJ.)
Pros and Cons of STL Files
Like any format, STL has its drawbacks. The table below gives a clear overview of the main pros and cons:
Pros
Cons
Compatible with almost all CAD programs, slicers, and 3D printers.
Cannot store color, texture, or material information.
Small file sizes make sharing and uploading easy.
Does not include metadata such as units, tolerances, or design history.
Can represent a wide variety of object shapes.
Hard to edit once exported, compared to working in the original CAD file.
Simple triangle mesh is fast for slicing software to process.
Curved surfaces may look faceted if the triangle resolution is too low.
How can I Create STL Files for 3D Printing?
To get an STL file, you can either design one yourself or download a ready-made model online. Which path you choose depends on whether you want something original or just a quick way to start printing.
Option 1: Designing Your Own STL Files
The process of creating an STL file usually follows three simple steps:
Choose a CAD tool and design your model. Make sure the model is solid and watertight so it can be printed.
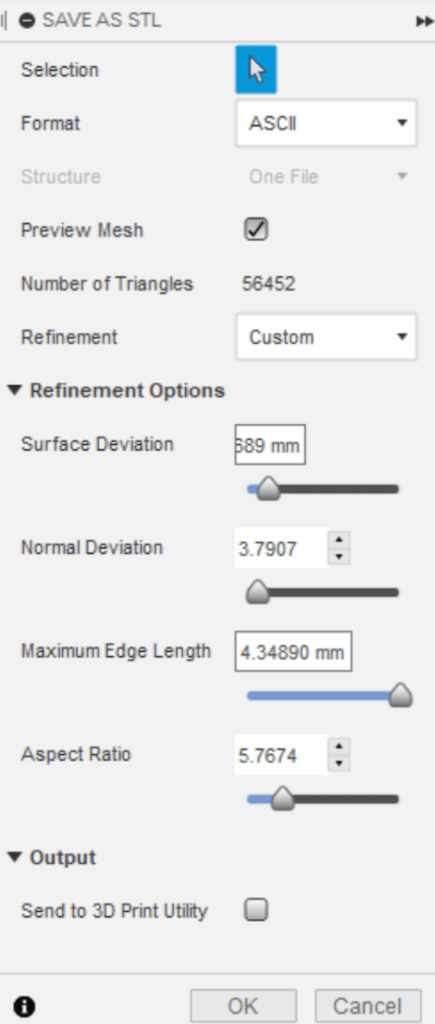
Export the design as an STL file. Use default or high-quality presets for best results.
Import the STL into a slicer. The slicer converts it into G-code, the instructions your printer will follow.
While this may sound technical, the right software makes it beginner-friendly. Many CAD programs now offer intuitive interfaces and one-click STL export. Here are some of the most popular choices to help you get started.
Tinkercad : A free, browser-based tool with a simple drag-and-drop interface. You can combine basic shapes to create models like keychains, tags, or small figurines. Exporting as STL is just one click, making it perfect for absolute beginners.
Fusion 360 : More advanced, but still beginner-friendly. Free for personal use, it supports precise, parametric modeling—great for parts such as brackets, enclosures, or gears. When ready, you can easily save or export your design as an STL.
Other Options : SketchUp works well for architectural shapes, FreeCAD is a capable open-source choice, and Blender is strong for artistic or sculpted models (though it comes with a steeper learning curve).
Option 2: Downloading STL Files from Online Repositories
Of course, you don’t always have to design everything yourself. The 3D printing community has shared millions of STL files online, ready to download and print. If you’re looking for a gadget, figurine, or even a replacement part, chances are someone has already made it.
Popular STL Repositories
Thingiverse: One of the largest collections of free STL files, with millions of models ranging from tools to toys. A great starting point for beginners.
MyMiniFactory: A curated platform with both free and premium files, often used for collectibles, miniatures, and cosplay props. Models are checked for printability.
Cults3D: A mix of free and paid STL files, with a vibrant community and frequent trending designs. Good for decorative or unique projects.
Other Sites: Printables (by Prusa Research), CGTrader, and Pinshape also host large libraries of printable models.
Tips for Using Online STL Files
Check the description: Look for recommended print settings (layer height, supports, etc.).
See makes/comments: User feedback can reveal whether the model prints well.
Check licenses: Most free files are fine for personal use, but review if you plan to remix or share.
Mind scaling: STL files don’t carry unit info (mm vs inches). Adjust scale in your slicer if the model looks too big or too small.
How to Convert STL Files into Printable Files
Once you have an STL file, the next step is to turn it into instructions your 3D printer can understand. This process is called slicing.
An STL file defines the shape of your model, but a printer can’t read “shape” directly. It needs to know exactly how to move, how fast, and how much material to extrude (or where to cure resin). A slicer program takes your STL and converts it into G-code—a detailed recipe of step-by-step instructions for the printer.
(Think of the STL as a picture of a cake: it shows what the cake looks like but not how to bake it. The slicer produces the recipe, and the printer is the baker.)
Ultimaker Cura: A free, open-source slicer with a clean interface and plenty of features. Developed by Ultimaker, it’s highly versatile—supporting many different printer models and backed by an active community. Cura is especially popular with beginners because it offers reliable presets that work straight out of the box, while still allowing advanced tweaks as you gain experience. It runs on Windows, Mac, and Linux, and is regularly updated, making it a go-to choice for many FDM printer users.
PrusaSlicer: PrusaSlicer, created by Prusa Research, is also free and open-source. Originally built for Prusa machines, it now supports a wide range of printers and is known for its intuitive interface and well-structured profiles. It includes powerful tools such as paint-on supports and the ability to apply different settings to specific regions of a model. Beginners often get great results using the default settings, but the software also scales well for more advanced users. In addition to FDM printing, PrusaSlicer includes a mode for SLA resin slicing, though many resin users still prefer dedicated tools like ChiTuBox or Lychee.
Apart from these, some other slicers you might come across: Simplify3D (paid, advanced features), ChiTuBox and Lychee (popular for resin printers), and Slic3r (the open-source base of PrusaSlicer). For most beginners, however, Cura or PrusaSlicer will cover everything you need to get started.
Basic Slicing Workflow
Import the STL file into your slicer.
Select printer and material so the software applies the right defaults.
Orient the model on the virtual build plate; rotate or scale if needed.
Adjust key settings like layer height, infill percentage, and supports.
Slice and preview the file layer by layer to check the result.
Export the G-code and transfer it to your printer (usually via SD card or USB).
Quick Tips for Slicing and Printing STL Files
Check your model before slicing
Make sure the STL is watertight, with no holes in the mesh. Most slicers will warn you if errors exist.
Always preview the slice
Scrub through the layers to confirm supports and infill look correct before printing.
Pay attention to the first layer
Good adhesion is critical. Level the bed (FDM) or build plate (resin) and make sure the model is firmly attached.
Use supports for overhangs
Overhangs steeper than ~45° usually need supports. It’s better to remove supports after printing than to restart a failed job.